Your vehicle is an important part of your day to day life. You depend on it to get you to work, school, or your errands on a daily basis. The seats need to be comfortable enough to accommodate all that driving. If your seats are showing signs of wear and tear, foam is the best way to fix them for a renewed sense of comfort. A car with an uncomfortable seat is never fun, so it’s important to take care of this matter as soon as possible. Let’s take a look at using foam for automotive seat repair.
Why Foam?
When it comes to automotive seat repair, there are a few reasons why foam is the ideal candidate for replacements. For starters, most vehicle seats are made with foam to provide the support and softness you need for sitting. Foam is also ideal because you can glue it in place to handle holes in the seat without replacing the entire seat cushion.
Foam is an affordable fix that is available in a range of densities to suit your preferences. It is also easy to work with in terms of measuring, cutting, and gluing.
Items Needed
When attempting automotive seat repair with foam, there are a few tools you will need to get started. These tools are relatively easy to find at most hardware stores or foam suppliers.
Seam Ripper
This is the tool used to remove the cover to gain access to the area where the foam will be placed.
High-Density Foam
A higher density foam will give support, while also offering ample cushioning for comfort. The amount of foam you need will depend on the size of the repair. It is always better to buy more than you need than to not have enough. It is usually better to buy larger sheets so that you can easily cut the pieces to the size that you need.
Measuring Tape
For measuring the pieces that you will need.
Marker
You will need a marker to outline where to cut the foam according to your measurements.
Sharp Blade
A blade is used to cut the foam to your size. The best ways to cut this foam type would be a sharp serrated blade or an electric turkey carving knife.
Spray Adhesive
Spray adhesive will be used to securely hold the foam to the rest of the cushion. Be sure to use spray adhesive intended for foam to get the best hold possible.
Fabric Stapler
This is used to hold the fabric in place after you pull it taut over the seat cushion.
How to Repair Seats with Foam
Once you have assembled all the necessary tools for the job, you are ready to get started! This is a relatively easy task, so it should only take about 30 minutes to complete.
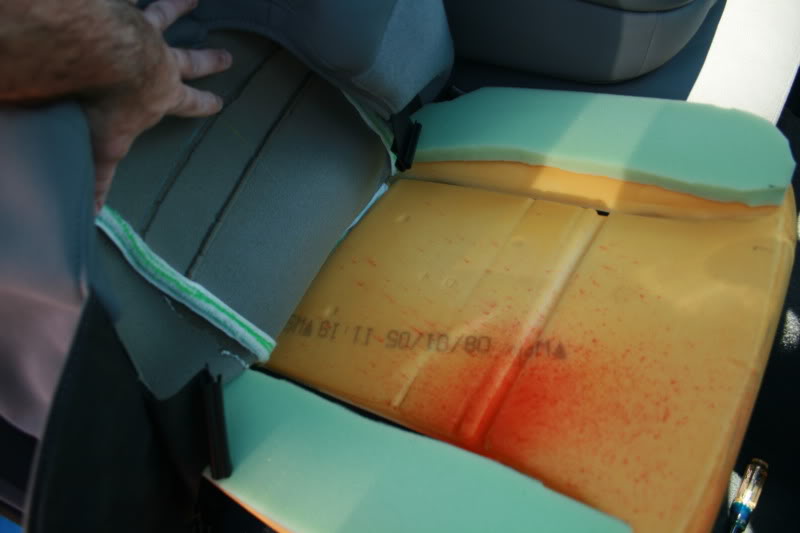
Step 1: Removal
The first step is to remove the fabric from the car seat. While some cars may have removable seat covers, others will have cloth sewn over the seat that will need to be removed using the seam ripper. Be sure not to tug on the fabric so you can salvage it later. Once you remove the fabric, you should be able to see what you are working with.
Step 2: Measure
Using the tape measure, take measurements of the area where the foam is missing from the cushion. You should also measure the thickness of the seat cushion. If you need to glue the sheets together to accommodate the thickness of the seat, you can do so later.
Step 3: Mark
Mark your measurements on the new foam sheets to figure out how much you need. Draw an outline that matches the hole in the seat cushion, but make it about 1 inch more than you need on each side. This allows room for errors. You will trim it down later to match the hole in the cushion.
Step 4: Cut
Once you have marked the foam, it is time to cut the foam with your knife. Make sure you cut on a surface that can handle the blade as it goes through the foam.
Step 5: Place and Glue
Now that you have cut the foam, apply adhesive to the back of the foam and place it in the hole. Make sure you don’t spray the glue on the excess before placing it so you can trim it down with ease. Trim off any excess foam as you go. Continue trimming all the excess off until it is smooth. Press the foam firmly in place, and hold for a few minutes to give the foam a secure hold. If the foam seems loose, add some extra foam or adhesive to get a better fit.
Step 6: Recover
Once you are satisfied with the job, you put the cover back on the seat. If it is a traditional seat cover, simply place it back on the seat. If it has a seam, you will need to pull the fabric back in place, and staple it down with a fabric stapler. If the fabric has a hole, you can replace that as well, if you desire.
These are the tools and steps for replacing a foam car seat. Foam is a great asset for this job and can help restore your seat in no time. It’s an easy task that is sure to give your seat new life with maximum comfort!

202 dodge dakota left seat cushion foam
We would suggest our Super Max Foam for your application.
2006 Jeep Grand Cherokee driver’s seat cushion, some foam in center of seat is missing. What type of foam do you recommend?
For this application, we would typically recommend our Super Max foam. Please Contact Us for further details.
1973 Toyota FJ40. I need both lower cushions replaced, and a bit of the uppers “filled” for my new seat covers. All suggestions welcome.
thanks!
For car cushions, we recommend our Super Max foam due to its ability to hold up to engine vibrations.
do you guys offer a oem replacement for 2014 chevy tahoe with heat & air provisions?
We do offer many Open-Cell foams for this type of application, but we do not carry any foam that is specific to a certain model.
What would you recommend for a 2006 Honda S2000 thigh bolster foam?
Although we do not know the foams used for vehicles, we typically see our Super Max foam used for this application.
hey there,trying locate the best foam to re-upholster my seat on my 1956 ford truck bench seat
is that something that you could help me with?
Please Contact Us for help finding the best product for your application.
need rear seat foam for cushion and seats for 94-98 mustang gt.coupe. prefer pre molded. anything available?? thamks
Unfortunately, we do not carry any pre-molded foam. If you were interested in cutting the foam yourself, though, we would recommend our Super Max foam.
What form would you use for a car headrest? Super Max or Super Lux or other??
Hello,
Thank you for reaching out to The Foam Factory via our blog.
Per your question, we suggest using the Super Max foam for the seat, backs and headrest!
Please let us know if you have any other questions.