Driving can be a burden, especially when your seatbelt is uncomfortable or there are noisy or valuable things rattling around in the trunk. These annoyances can be easily alleviated with a few super easy DIY ideas that use foam to make game changing car accessories for your next drive. Before you take a long trip or even go get your groceries, create one of these easy foam car accessories by following these step-by-step instructions!
DIY Seatbelt Foam Sleeve
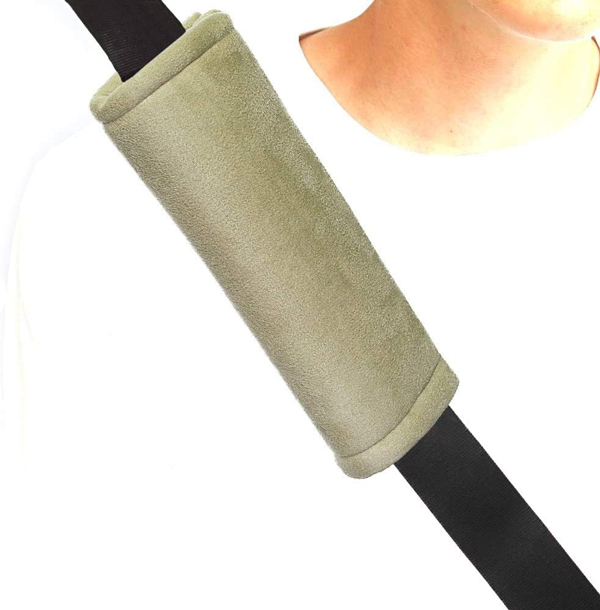
Stay safe and cozy for your whole drive by protecting your neck and shoulder with a foam sleeve for your seatbelt. They’re incredibly easy to make – just follow the process, and you’ll be ready to get driving comfortably in no time!
Step 1: Gather Your Supplies.
• Super Soft Foam or Clothbacked Foam
• Fabric scissors
• Measuring tape (tailor or seamstress measuring tape that is flexible)
• Pins and large-eyed needle
• Fabric and thread (color coordinating works well)
• Serger or sewing machine
• Sew-on Velcro
Step 2: Decide which side of the fabric you’d like to be visible, and which you’d like to touch your seatbelt directly. If you decided you wanted a color fabric to brighten up or personalize your car, this side would be on the outside.
Step 3: Layer your fabric on the top and bottom of your foam with the outside of the fabric showing on the top or bottom and the inside of the fabric touching the foam. Imagine a sandwich where the fabric is the bread. Pin the sandwich in place so that all of the materials are held together for the next step.
Step 4: Cut your fabric foam sandwich into a 7″ x 10″ rectangle. This will make sure it’s long enough to go around your seatbelt while leaving room for the Velcro.
Step 5: Time to sew! If you have a sewing machine, set it to a very wide zigzag stitch and sew it up around the edges. Make sure the stitches are making it through all 3 layers. If you have a serger, use both needles (4 threads) and set the tensions to 4 (or normal setting). Remove the pins and set the stitch length to as long as possible. Sew up one side, and then to create backstitching, stitch over your starting stitch by 1” and leave yourself a long tail of thread. Double-check to make sure that the stitches made it through all 3 layers of your fabric foam sandwich.
Step 6: Use a large-eyed needle to pull the thread tail through the stitching and trim. Once you’re done, you’ll have a nicely sewn fabric and foam sandwich of 7” x 10”.
Step 7: Sew the two matching strips of sew-on Velcro on the inside face along the 7″ sides of your foam sandwich.
Step 8: Wrap the foam sleeve around your seatbelt, secure it with the Velcro, and you’re ready to go!
No matter what kind of vehicle you are in, the design and seating arrangement is based on the average person. Unfortunately, no two people are exactly alike! Height, weight, shape, and health can differ from person to person, so a seat belt that fits well on one person may cut into the neck of another. Seatbelts were crafted to be safe, but not necessarily comfortable, so enjoy more comfort with your seatbelt foam sleeve.
DIY Trunk Storage
Don’t be distracted by the noise of your things rattling around in your trunk – make this quick and easy foam box to solve the problem for good! A foam box in the trunk for groceries or valuables can help save them from being tossed around and damaged.
Step 1: Supplies
• Charcoal Foam
• Tape measure
• Pencil
• Hot glue gun
• Craft knife or sharp utility knife
• Ruler
• Carpenter’s square (optional)
Step 2 – Measure:
Get an idea of the dimensions so you know how large you’d like your foam box to be. You’ll need to decide how high, wide, and deep the box will be.
Step 3 – Draft/Draw:
Now we’re going to draft the box itself and cut out the foam pieces you’ll need. Take your ruler and grab your foam and pencil. Using the ruler, mark the dimensions for depth, width, and height that you’d like your foam to be. Each box you make will have five pieces: a base and four side pieces (2 pairs of matching pieces). Take your time when measuring and cutting. Not only will this ensure you don’t cut yourself, but you also want to ensure each piece is the right size and the corners are square. A carpenter’s square can make this a little easier, if you have access. You can take a minute and make sure everything looks right by holding the pieces together to ensure everything fits. You may have to shorten a couple of the sides to account for the thickness of the foam.
Step 4 – Glue: Once we know everything is cut, and everything fits, it’s time to glue the box together. Start by taking your base piece and placing it on an even surface. Grab your hot glue gun, and draw along the edges of the base. Take each side and place it onto the glue line to form the wall, making sure to hold it there for a few seconds so that it will set. Make sure to glue the sides together where they touch, as well. Once all eight “joints” are glued, let it dry for about an hour and a half.
Step 5 – Final Steps: Just to be safe, we encourage you to reinforce the walls with an extra layer of glue where they attach to the base. Take your hot glue gun and draw a line on the interior of the box right where the sides meet the bottom. Let this dry for an hour and a half as well so that your box will be strong and sure to hold.
Know that your DIY trunk storage box will be ready to use! Place it in your trunk where you see fit. We hope you find these quick ideas helpful, and they are by no means the only ways to put foam to good use in your car or truck. If you have any questions or suggestions, Contact Us directly!

Have tried to contact you for questions about an order I’d like to make but I can’t get past the”letters displayed” game!
You should be able to Contact Us directly through the e-mail listed on the linked page.
What is the cost of the super max foam.
The cost of the standard sheets of Super Maxfoam can be found on our website. If you are looking for custom cuts of the Super Max foam, feel free to Contact Usdirectly.