The world of cosplay is full of fun characters and exciting adventures. When it comes to choosing your cosplay character, you want to make sure that every element of your costume portrays the character accurately from head to toe.
Since horns can dramatically increase the appearance of a cosplay helmet, it makes sense to know how to make a pair using foam. From mythical legends to demonic characters, there are many ways to use this element to your advantage. Let’s take a closer look at how to make cosplay horns using foam.
Preparation is Key
Jumping straight into making your cosplay is going to result in a subpar finished product. To prevent having to restart from scratch, you will want to make sure you have a plan and the right supplies before you get started.
Make a Pattern
The first step to make cosplay horns is to create a pattern. You will need to have an idea of the character to make sure the pattern matches the style of their horns. Once you know what their horns look like, you can start working on the pattern. If you are not great at drawing and your character is a particularly popular one in the cosplay world, you may be able to find a pattern pre-drawn online.
To create the pattern, you will need a marker, tracing paper, and scissors to cut out the pattern.
On a flat surface, draw the shape of the horns on the tracing paper. Most horn shapes are easy to draw, but you may need to give it a few tries to get it right. Make sure the two separate pieces are equal in size in terms of width and length for a proper outcome. If you want both sides to be the same size, feel free to use a tape measure. Once you have the pattern traced on the paper, you can cut it out with scissors.
Gather Supplies
Once you know the size of the horns, you can get the rest of your materials together. You will need enough foam to meet the DIY project needs. If you are making thick horns, a thicker foam is a good choice, but you can also glue together thinner pieces to create the same effect. While there are colored foams on the market, you will most likely paint the foam in the end, so the color of the foam isn’t as important to the process when gathering supplies.
For this project, you will need essentials, such as a blade to cut the foam, a marker, glue, contact cement or liquid latex, paper towels, paint, and a paintbrush. You will also need something to secure the horns on your head, like a headband. Make sure the headband will be thick enough to hold the width of the horns.
Making Your Foam Horns
Now that you have your supplies and your pattern, you are finally ready to get started on this project.
Trace and Cut Foam
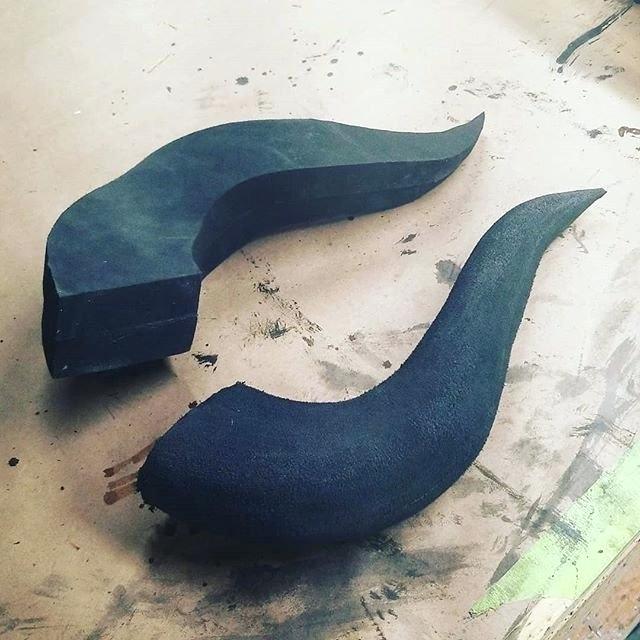
Place your pattern on the foam and trace the horn shape with a marker. You can then cut out the pieces with a box cutter or sharp knife. If you are gluing pieces together to create a thicker piece, you will need to cut out multiple pieces so you can glue them together.
Glue Layers Together
The next step in how to make cosplay horns is to glue the pieces together. Even if the foam you are using is relatively thick, it is still a good idea to glue two separate pieces together because it creates a 3D look instead of a flat look. You can use a range of solutions here such as hot glue, liquid latex, or contact cement to adhere the pieces together. The important thing is that you use enough to create a secure hold. Be sure to give the horns sufficient time to dry to solidify the hold.
Draw Base
Once you have the pieces glued together as needed, you will want to mark the bottom of the foam horns where they will be glued to the base. This will help later on to make sure the horns stay upright for your portrayal.
The Final Touches
Refine/Adjust Shape as Needed
If you need to shave off a bit of foam to get the right shape, you can do so with a box cutter or sharp blade. Be sure to compare the two separate horns as you work to keep them even in appearance.
To add texture to the horns, take long strips of paper towel and wrap them around the surface of the horns using liquid latex and brush them down. This will create texture and even ridges in the horns to give them a more realistic appearance.
Paint
Next, you can paint the horns! You want to make sure the latex is dry from texturizing before you begin to paint. You should also make sure you work on a surface you don’t mind ruining such as old newspapers or grocery bags.
A good tip for painting is to start with a lighter color for the base and then go darker, as needed, to give you more control over the end result. Once you have the horns painted the way you want them, make sure you give them plenty of time to dry before moving on to the next step.
Glue to Base
The final step is to glue the horns to the headband so you can wear them as part of your costume. Add glue or contact cement to the bottom of the horns and press them onto the headband where you want them. Allow them to dry for at least 24 hours before wearing.
There you have it! You are now prepared to cosplay as your favorite character. Getting prepared for the next cosplay convention is now easier than ever with help from Foam Factory!
