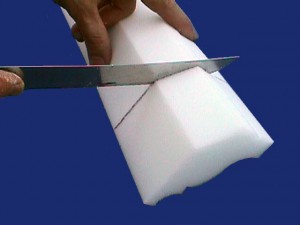
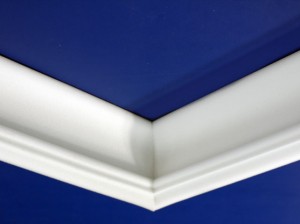
Here at Foam Factory, Inc., we offer a wide range of foam cutting services that can produce tens of thousands of identical pieces and precise, computer-controlled cuts made with a stream of water .005 inches in diameter. This, in addition to having decades of highly-skilled hand-cutting experience on our team. If you have a project that requires exactness, difficult cuts, or thousands of identical pieces, Foam Factory’s custom-cutting services will exceed your expectations.
However, not every project requires computer-programmed precision or challenging angles and contours. Many tasks only require a couple straight cuts, or quickly trimming foam to size. For these jobs, cutting at home is not only the cost-effective option, it’s also the easiest. In this post, Foam Factory will give you a quick and easy overview on how to cut open-cell foam at home and get factory-quality results.
—

Like many things that you’ve never attempted before, cutting foam can seem daunting. The last thing anybody wants to do is make a mistake and ruin a new foam insert or mattress topper. Fortunately, cutting foam is the easiest thing since pre-sliced bread.
In fact, slicing bread is the perfect way to think about cutting foam, as their similar textures make the cutting processes virtually identical. Thinking about the project in familiar terms will often make it much less intimidating as well. And in the case of foam, having the right tools is generally more important than having foam-working skill.
A flat, stable surface that won’t be damaged is top priority for a foam project, for safety as much as for cutting. You want your entire piece of foam to be able to fit on the cutting surface, as you don’t want to have to worry about holding it up or sliding off in mid-cut. Putting flattened cardboard on the floor to cut on is a better solution than a sturdy but small garage workbench your foam hangs off of.
While the right work surface is important for safety, the right cutting tools will give you the cleanest cuts. There are only two types of knives that should be used to cut foam at home. Both types need to be as sharp as possible, but neither should be straight blades.
Option one is a serrated carving knife or bread knife. As mentioned earlier, cutting foam is essentially the same as cutting bread, so it only makes sense that you would use the same type of knife as well. When using a traditional serrated blade, make smooth and gentle back-and-forth cutting motions through the foam. Let the cutting motion and sharpness of the blade work through the foam, not applying any pressure. Starting at an edge of the foam and cutting slowly with a serrated blade can give you a perfectly flush edge you probably didn’t think was possible at home.
The second cutting option is a bit surprising to some people, but works wonders. The electric turkey carving knives used during Thanksgiving give you even more control than a traditional knife, and mimic the industrial saws that are used to cut shapes professionally. Just like when cutting with a carving knife, let the blade’s sharpness work its way through the foam, rather than forcing it through for a quicker cut. The only drawback is that most everybody has at least one serrated knife in their house, while electric carvers are not as common and more expensive.

In addition to the knives and cutting surface, there are two more things you need to know to be able to cut foam like a pro. The first is that you should never compress foam when cutting. Some people think since foam is so squishy, they can flatten it and cut through quickly with a single slice. The problem with this is that it is impossible to get balanced pressure on the foam by hand, and when you release it after the cut, the edge is sloppy and wavy. Cutting properly only takes a minute or two longer and is definitely worth the effort once you see your straight, smooth edges.
The other tip involves cutting around traced lines on the foam. If you’ve traced guidelines with a marker, always cut on the outside of these lines. Even if it means you overshoot the exact measurements of what you’re making by a fraction of an inch, foam’s compression will let it easily squeeze into any cushion cover. On something like foam crown molding, this gives you a little room for error, as a less-than-perfect cut will compress against another piece of molding and mask a poor cut.
As you can see, cutting foam is a lot easier than it may seem at first. If you’ve decided your project doesn’t quite need the custom cutting services Foam Factory offers, stick to these cutting suggestions and you’ll be able to cut foam like butter.


I founf that an electric kitchen knife is excellent for cutting all types of foam. You get a clean, straight cut every time. Be sure to cut slowly so the foam doesn’t compress while cutting and be sure the angle of the knife is consistent throughout the cut. Even angle cuts are easy to do.
Hi Jim,
You are absolutely right! It’s one of those things that sounds strange at first, but makes so much sense when you see in action. Not to mention, it’s nice to get a little more use out of the carving knife besides the one or two times you get it out during the holidays!
– Foam Factory
You mention using a closed cell and opencell layers for motorcycle seats. What do you recomend for a spung seat with contoured foam of about 1-3″ thick. Should the layers be glued togeather?
Thanks.
Please Contact Us directly for more information regarding your inquiry.