A day filled with delicious scents like slow-roasted turkey, bubbling cranberries, and homemade stuffing is right around the corner. This year, if you feel like you may be running behind on fall décor and Thanksgiving fun for your home, then check out a few of these Thanksgiving foam crafts that will surely gobble up your little turkey’s attention. Easily add a festive touch to your home with these simple DIY crafts that are perfect for ringing in the season! Here are three of our favorites:
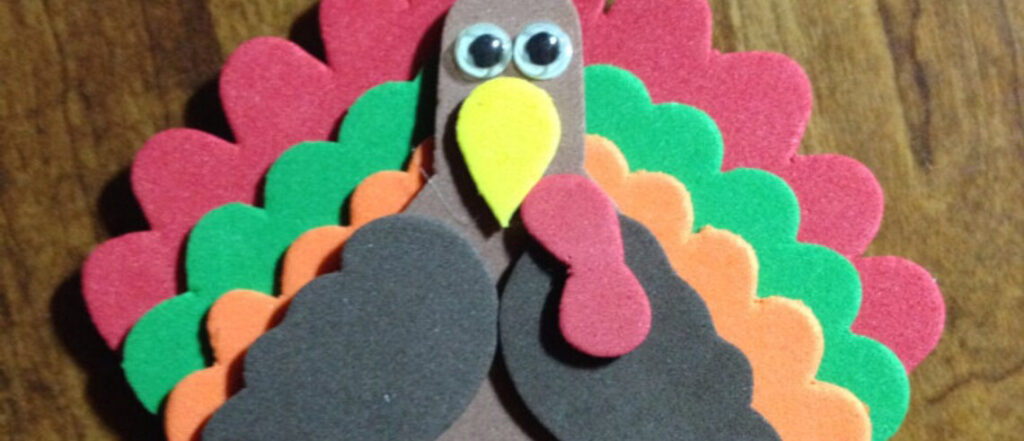
Foam Turkey
This easy foam turkey can add an adorable touch to your home’s holiday style.
Supplies:
- Cardstock
- Marker to trace with
- 1/4″ 2LB Cross Linked Polyethylene foam
- Kid-safe glue
- 2 adhesive googly eyes for each turkey
Directions:
- Draw out shapes on cardstock for kids to use as a template. One template will be leaf-shaped to create the turkey’s feathers. The second template will be one small circle and one large circle. Cut the main body of the turkey from the brown foam—one small circle for the turkey’s head and two larger circles for the turkey’s front and back.
- Use the leaf template to cut out turkey feathers in any color you or your child prefers.
- Use a kid-safe glue. Glue the small brown circle onto the larger one
- Affix the adhesive googly eyes.
- Flip the turkey over so the googly eyes are face down. Glue the turkey’s feathers along the back. Seven of these will fit well, but you can glue as many or as little as you would like.
- Once the feathers are placed, glue the second large brown circle over the feathers to ‘hide’ them, and then let the glue dry thoroughly if needed.
Voila! You now have a simple, but adorable Thanksgiving foam craft!
DIY Foam Fall Leaf Garland
To celebrate the turning of the leaves and Thanksgiving together, you can create a stunning fall leaf foam garland to hang anywhere in your home!
Supplies:
- Free downloadable leaf templates (large and small)
- 1/4″ 2LB Cross Linked Polyethylene foam
- Foam adhesive
- Scissors
- Pencil
- Hole punch
- Twine
- Beads of your choice
- Large embroidery needle
Directions:
- Print and cut out each of the leaf templates.
- Use a pencil to trace the outline of your leaves onto your colored foam.
- Carefully cut out your leaves using scissors.
- Punch two holes along the bottom of the leaf, roughly ½” apart.
- Once you have all the desired leaves cut and holes punched, cut a piece of twine to your desired length for the finished garland.
- Take and thread your embroidery needle with twine, and add two or three beads.
- Next, begin adding a leaf by passing the needle up through the first hole on the leaf and down through the next.
- Alternate beads between leaves until you reach the end of your twine.
There you have it! Your gorgeous fall leaf foam garland is complete and ready to hang!
Foam Pilgrim Hat Table Place Cards
Make some adorable pilgrim hat place cards without purchasing a ton of supplies! This is one of our favorite Thanksgiving foam crafts.
Supplies:
- Small cups (like Dixie cups)
- 1/2-1/4″ thick Charcoal foam
- Narrow grosgrain ribbon
- Gold glitter glue
- Glue gun/craft foam glue stick
- Cardstock in 2 different colors
- Small paperclips
Directions:
- Set your cup on the charcoal foam with the open side facing up. Trace around the cup onto the foam, then cut it with sharp craft scissors.
- Measure the width of your cup, and cut a strip the same size as the width.
- Cut a circle two to three sizes larger than the cup as the hat’s brim.
- Turn your cup so the open side is facing down. Then, take the circle you traced from the bottom and glue it to the bottom.
- Next, glue the strip of foam around the paper cup. Doing it gradually, one strip of glue at a time will help it adhere to the cup and keep the shape manageable. If your strips are too long or wide, you can easily trim them.
- Slip the paperclip into a small open space at the top. Tuck some of it behind the felt, and add a touch of glue to adhere the felt over the paperclip.
- Glue around the lip of the paper cup, then set it evenly in the middle of your larger foam circle.
- Wrap your ribbon around the hat with a glue dot. Doing so will keep the ribbon’s ends together.
- Draw or paint a ‘buckle’ onto the hat using the gold glitter glue.
- Let the final product dry.
- Cut out the paper. Write the names of your family and guests on them. Finally, slide the paper into the pilgrim hat’s paperclip.
Mission accomplished! All that is required now is to set them on the table.
Other Foam Thanksgiving Craft Ideas
What other foam crafts can you and your family try? We’re so glad you asked! Here are just a few more ideas for decorating your house for Thanksgiving:
- Fall colors woven from foam strips
- Wreath made from cut-out foam leaves
- Foam pumpkins and gourds
- Foam cornucopia
- Foam pie slice garlands
These are just a few beautiful crafts you can create this Thanksgiving using foam. For more foam craft inspiration, check out our blog. Our post “Foam Crafts: Spooky Halloween Cutouts” is perfect for celebrating the spooky holiday.
At Foam Factory, we produce high-quality foam products to make your busy life more colorful and more festive than ever. From our foam family to yours, we wish you the happiest Thanksgiving!
