As it has been for hundreds of years, game nights with family and friends are a great way to spend fun time together and bond. Often, these can include poker night and family game night, but it also includes a rise in trading card games and roleplaying games. Now, more than ever before, friends are getting together to dive into prolonged homemade campaigns that can last months!
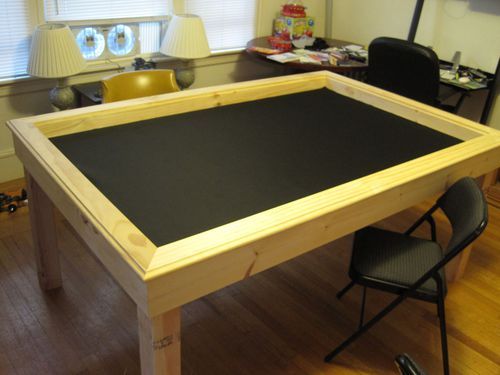
One of the most crucial aspects of productive roleplaying campaigns is having a nice, easy, comfortable place to lay out any boards, cards, books, or other gear necessary for the game with room to spare! What really makes this type of table perfect for gaming is the foam that is used to pad the playing area. A few different foams can be used here, but the most commonly used are Volara foam or Neoprene rubber. These two options are great because they provide protection for the harder surface underneath, are highly durable, make for a soft and bouncy surface (great for dice rolls), and are even resistant to liquid spills.
If you are feeling like you want to jump on the bandwagon of gaming, and want a table of your own, then this blog can help! Let’s get started with this DIY project to get you on the fast track to your very own Gaming Table!
Supplies:
- A kitchen table (bought or handmade) Note: the table is best if it does not extend, and should have four legs instead of a pedestal.
- 1/8” Neoprene rubber or Volara foam
- ¾” OSB (Oriented Strand Board)
- (4) L-Brackets
- (4) 1” x 1” x 1’ boards for table cleats
- Speedcloth (This is the material often used for poker tables, and is often the preferred surface for most poker players)
- Hand tools should also be accessible: drill, dremel saw, jigsaw, palm sander, etc.)
How to Make:
- The first step is to look under the table before you take anything apart and use a pencil to mark/draw a line on the bottom of the table top piece inside the skirt on all four sides. This is how you will know how to install the cleats later in the directions.
- If it does not already exist, the first step is to make a base for the vaulted table top. Think of it as a kitchen table with just the legs and base for the top, but without the top sitting on it yet. This is the skeleton of your new table. Before moving forward, make sure that all screws are tightened and any place that is glued retains its hold. If this is an existing table, then this would be the time to unscrew and remove the tabletop.
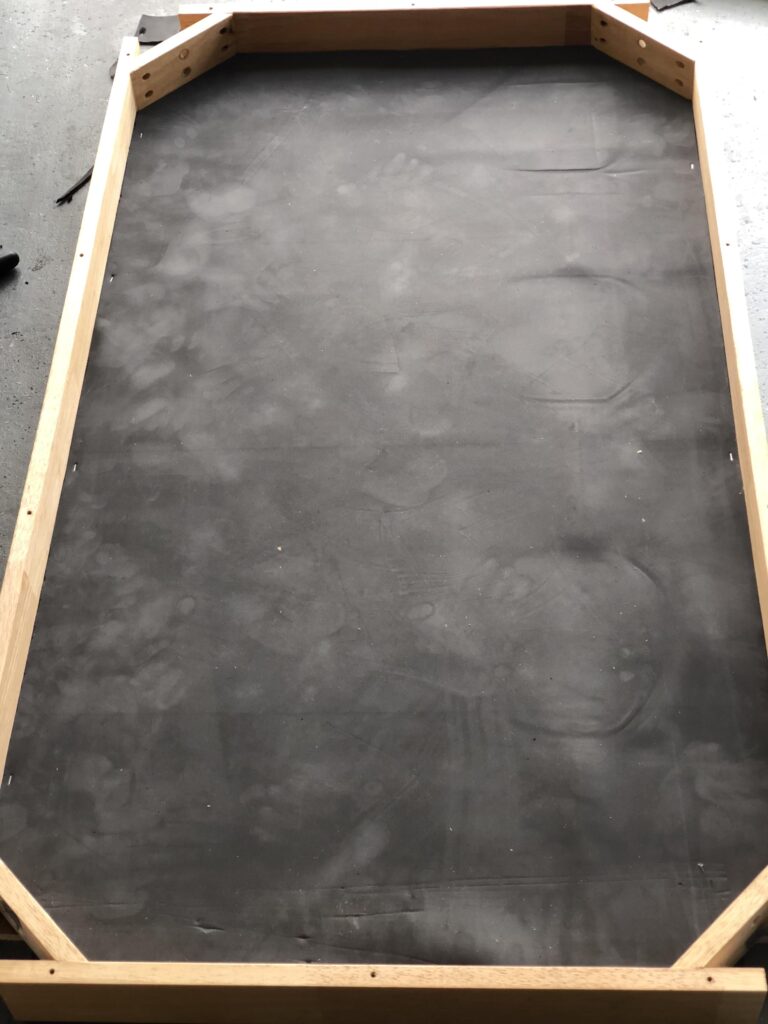
- The next step is to cut and place the OSB. To do this properly, you can use the base of the table as a template for accuracy. Once you have cut the OSB to the size that you need, and before you make any further adjustments, you will want to set the OSB into the base to make sure that it fits snugly!
- Repeat the process with the Volara foam Neoprene rubber. Cut using the tabletop base as a template, then make sure that it fits comfortably within the table, and on top of the OSB.
- If you are covering the gameplay area with the tabletop when it is not in use, the next step is to glue your 1” x 1” blocks on to the bottom of the tabletop where you made the pencil marks in the first step. By doing this, you are preventing the tabletop from sliding around on top of the gaming board. To measure correctly, the blocks should be screwed into the bottom of the tabletop part in a way that the majority of the wood is near the center of the table. In other words, the block edge should be lined up on the inside of the pencil marks. Be sure that when you screw them in, the screws do not go through the top of the table!
- If the legs were removed, now is the time to reinstall them. Add an L-Bracket at the midpoint of each midrail so that the OSB can rest there without sagging or warping over time. Next, place the Neoprene on the OSB. If you would like to secure them, you can glue the Neoprene and OSB together, but it is also okay to let it move freely under the speedcloth once you put it on.
- Simply place the speedcloth over the Neoprene and OSB, then place on the brackets. Now, pull the speedcloth snug under the table and staple the material to the OSB while keeping it tight. Make sure you staple it enough so that it stays in place and is taut all the way around.
- You’re finished! If you want, you cut off any additional fabric or add any personalized details, but you can certainly feel free to add and remove the tabletop as you see fit! Note that, although this instructional may give you general guidance, it is a DIY project, so you can feel free to make changes and adjustments to fit your preferences.
Note that, although this instructional may give you general guidance, it is a DIY project, so it can definitely be customized. One thing that is often added to gaming tables for added comfort is a padded elbow rest around the sides of the table. This can be done using our Lux-HQ foam. Cut to the appropriate size, this foam can be placed around the edges of a table and upholstered with vinyl, or another durable material. This foam then acts as something that can be leaned on comfortably as you move forward with your newest campaign or your next hand of poker!
With tabletop gaming becoming more and more common, this DIY project can pay dividends of fun for years to come. If you want to get into gaming culture, we are all for it! As always, Foam Factory, Inc is excited to be a part of all of your DIY projects! If you have any foam related questions to this or any other project, feel free to Contact Us today!
