A wealth of beautiful crafts can be made with a foam board as the base. If you’re a DIY enthusiast, foam board is an almost magical element to use because of its versatility. Let’s go through the basics of some ideas for foam board projects that make great craft activities and can add aesthetic value to your home!
DIY Foam Board Wreath
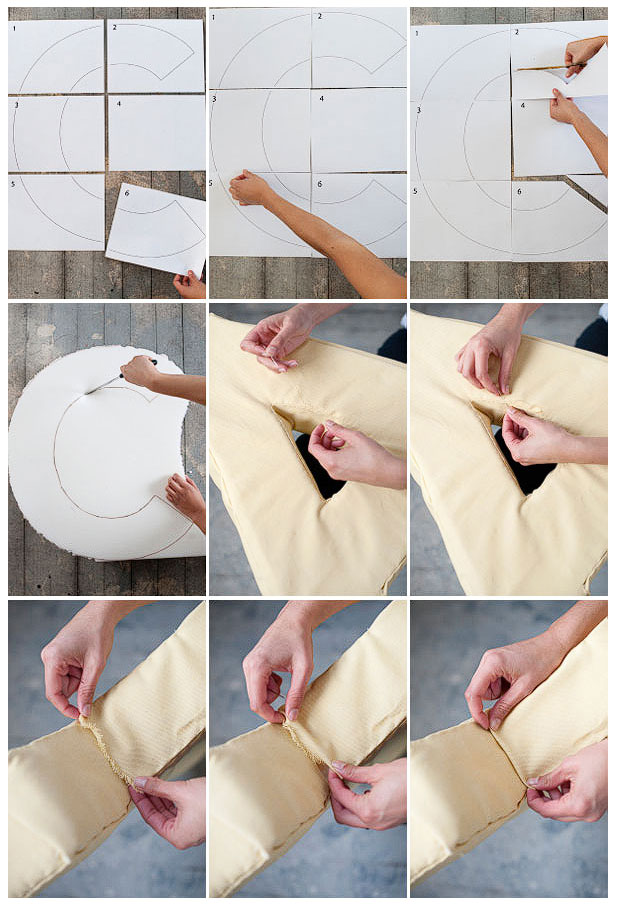
For our first project, let’s dive into something seasonal. Creating beautiful wreaths to celebrate spring, fall, or winter holidays can help to welcome people into your home with a special seasonal vibe. These wreaths are highly customizable and super easy to make.
Cut a circle out of your foam board and a circle within it to make a hollow center. If you’re looking for something a bit easier and maybe a bit different than the usual, cut an inner rectangle out of a rectangular-shaped foam board for a hollow center. Both shapes will work for this type of project and will look great!
Once you’ve created your desired shape, wrap the foam board with a decorative fabric. Whether you choose fake autumn leaves, a string of fake pine needles with Christmas lights, or a wavy ribbon with Easter eggs, the foam wreath will be a lovely addition to your door!
DIY Foam Board Frames
Gorgeous frames for your walls at events can be crafted by layering foam board. Using a hot glue gun, secure a smaller rectangular foam board on top of a larger one for a great-looking frame. The same can be done with circle or oval shapes. If you’re feeling extra creative, draw a custom design on the inner or outer foam boards and use a crafting knife to cut them out. Place them together and use hot glue to make them stay. These can be painted easily with bright or metallic colors to really make a statement!
DIY Foam Message or Pin Board
These are exceptionally easy to make! The hardest part is choosing your fabric. A popular option is burlap due to its durability, which you should take into consideration when making your choice. Once you’ve got the fabric, cover your foam board with the fabric and fasten it in the back using staples or hot glue. Grab some decorative pins or tacks and start adding messages and designs to this newly completed addition to your home.
DIY Foam Board Numbers or Monograms
These crafts are great to make events special in a unique way. The best way to start is by getting a stencil for the numbers or letters you’re using, but if you’ve got a steady hand you can outline what you need that way as well. Draw your desired numbers or letters on foam board using a pencil, then, cut along the lines with a crafting knife. Once they’re cut out, use the space in the foam board as a stencil to cut out scrapbook paper for the face. Glue the scrapbook paper onto the front of the number or letter. For a finishing touch, take some twine and secure it around the sides of the piece with a hot glue gun.
DIY Foam Board Push Pin Art
Take a foam board with your color of choice and place it into a matching frame. Take push pins of a beautifully contrasting color and start creating your design. You can use as many colors as you’d like, but make sure they stand out so that they’ll be seen against the board! Whether you make words or designs with your push pins, you’ll create a piece of artwork that is truly unique.
DIY Foam Board Letter Wall Art
Letter wall art is a popular option for decorating kids’ rooms. You can make this yourself! Using a large stencil or a ruler, draw the letter you want onto a foam board using a pencil. Take a crafting knife and cut the letter shape out. You can cover your letter with string or something fun and child-like, or leave it to your child to draw on the surface and create something personal.
DIY Foam Board 3D Creations
If you’re looking to put a little more effort into your project, you can make a wide variety of 3D shapes with your foam board. From marquee letters to deer heads, you can make almost anything! By cutting out the specific pieces you need with a crafting knife and using a hot glue gun to fasten them together, you can bring your own 3D design to life. Make sure to hold the pieces for a few seconds when placed on the glue so that they set, and let them dry for at least an hour and a half before you move them.
DIY Foam Board Boxes: File Holders, Letter Sorters, and More
You can make a variety of boxes out of foam board, from letter sorters to file holders. First, decide on the box you’d like to make. Is it going to be tall with a diagonal top to hold files? If you’re making a letter sorter, this would be the same, but it would be wider and need additional vertical slats. Next, write down the height, depth, and width measurements that will make your vision a reality. Choose a foam board with a color or design that will match your aesthetic. Using a ruler and a pencil, draw the pieces that you’ll need to construct your box. Cut them out using a crafting knife and a ruler for guidance and precision. Using a hot glue gun, draw a line on the edges of the base of your box. Place each wall onto the line, holding it there for a few seconds to secure it. If you’re placing slats within your box, draw a line for them with your hot glue gun and place the slat on top for a few seconds as well. Let your box dry for about an hour and a half. To secure your walls and slats, draw an extra line of hot glue where the edges meet the base. Let those dry for an hour and a half as well, and your box will be ready to help organize your life!
Looking for more fun DIY foam projects, or have questions about foam? Feel free to Contact Us!

Hi there I have been buying dollar store 1/8th 20 X30 sheets, which I cut up and glue together, to get a shape, from a stencil to make for example a 2D horse, cut out the body , legs and main and then glue together, then I use Spackling Fast dry pollyfiller to build up the curves, and then sand them when dry and paint with acrylic paint, then mount on 1/8 ply sheet cut to shape with a mounting device, ie. a big paper clip with a loop to hang on a wall. These have workout out really well, and there is nothing your can’t make, just depends on your imagination, and it’s very economical to do, litterly a few dollars . The Spackling is your most expensive item to buy, and you don’t need a lot of it, just smooth it on with a palllet or plastic knife.