Even though they are beautiful and classic, having glass and crystal Christmas ornaments hanging on your tree is risky business when you have children and pets in your home. A great alternative is to make your own Christmas ornaments out of foam! Not only are they childproof and pet-proof, but they can also become a fun activity to do with your family, a unique annual Christmas tradition, and create beautiful mementos and memories. Here are three adorable Christmas ornament crafts to try this year!
DIY Frosted Cookie Ornaments

This cute Christmas ornament craft can get a little messy, but the results are so worth it! You will need to collect the following supplies:
• Hot glue gun
• Christmas cookie cutters
• Scissors
• Pencil
• Ribbon
• Light brown craft foam sheets
• Glitter glue in multiple colors
To make these glittery Christmas cookie ornaments, start by picking out your favorite cookie cutters. Use them as a template, trace the shape onto the craft foam with a pencil, and cut it out. Use the pencil to sketch out a fun design onto your “cookie.” Then, use the different colors of glitter glue like they are frosting piping bags and make frosting! These will take a while to dry, so make sure they can be stored safely so they won’t get bumped or dropped. When the glitter glue has completely dried, cut 5-inch lengths of Christmas ribbon and attach them to the back of your cookies to become ornament hangers. And voila! Now your Christmas tree will be covered in beautiful and visually delicious Christmas cookies that are safe for pets and kids!
DIY 3D Foam Stars

While these glittery little stars are simple to make, they will really stand out on your tree! You will need to collect the following supplies:
• Glitter foam sheets in multiple colors
• Hot glue gun
• Scissors
• Utility knife
• String
• Small beads
• Star cookie cutters
Start by using the cookie cutters as a template and trace the star shapes onto the back of the glitter foam sheets. Each ornament will need four foam pieces of the same size, so stack pieces in matching sets of four. Cut out the star shapes. If your foam has a self-adhesive backing, peel it off and carefully stick two matching pieces together. Make sure to line them up as best as possible and trim off any excess foam. If your foam is not self-adhesive, attach the pieces with hot glue. Then by using a utility knife, cut notches into each star piece. The notches should be 1/8 inch or 1 centimeter wide. The notch on one of the two star pieces should start at the top and go halfway down. The notch on the matching star piece should start at the bottom and go halfway up. These two should fit together like a puzzle piece. Try sliding the two star pieces together using the notches to make sure they fit. If they do not fit, then simply make the notches longer and wider until they do.
Once your star pieces fit together and line up nicely, take some string, and cut it into 5-inch pieces. Thread two beads onto the string and double-knot the ends, making sure you have a tail of at least one inch past the knot. Thread the tail through the top of the star, and secure it with hot glue. Then secure the two star pieces together with a small amount of hot glue. And there you have it! Adorable little 3D stars to decorate your Christmas tree!
DIY Christmas Santas
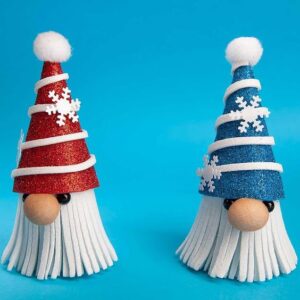
These adorable little Santas will take a little more time to make, but they will look amazingly cute on your Christmas tree! You will need to collect the following supplies:
• Hot glue
• Scissors
• Small white pompoms
• Small white snowflakes
• Small black beads
• Medium wooden beads
• Colorful glittery foam sheets
• White glittery foam sheets
To begin, cut your white glittery foam sheets into 12-inch strips 3 inches wide. Then, by making a lot of small cuts very close together along the length of the foam, turn these strips into a “fringe.” The cuts should go about two inches into the foam. Then roll these strips up tightly, and secure them with hot glue. This will be Santa’s beard. Take your colorful, glittery foam sheets and cut half-circle shapes. The half circles should be about 5 inches in diameter. Then shape these pieces into a cone and secure them with hot glue. This will become Santa’s hat. Cut very thin strips of white glittery foam, about 12 inches long, and wrap them around Santa’s hat to serve as stripes. Secure with hot glue as you wrap. Take the little white snowflakes and use them to decorate Santa’s hat. Glue a little white pompom at the tip of the cone. Next, take Santa’s beard and fit it into the cone and secure it with hot glue. Glue a wooden bead right below the edge of the cone, and glue one black bead on either side. You should end up with an adorable little Santa Claus who is wearing an oversized Christmas hat. How adorable!
We hope you enjoy these adorable and easy Christmas ornament crafts! All of the materials needed can be found at your local craft store. Merry Christmas and happy crafting!

Please tell me where I can purchase glitter foam in .6mm thickness? I see these projects but I don’t know where to purchase from
We have color foam that can be purchased. Glitter is not available through Foam Factory.