Get ready to make a splash this year with our inspiring DIY foam pool toys. They are easy to make and fun for the whole family! Add hours of enjoyment to your summer!
With summer just around the corner, it will soon be time for fun in the sun and water. If you have a pool, it is time to vacuum it, treat it, and take out those pool toys you bought your kids (or yourself, we don’t judge!). You may be lucky enough to find them all still in excellent condition, but weather and time can take its toll on toys, too!
Instead of buying new pool toys this year, why not consider making some? DIY foam projects and pool toys for summer are excellent projects for the entire family and can incorporate things that you may already have around the house. If you and your kids enjoy crafting and playing in the pool, let’s help you find the inspiration to make summer pool memories that will last!
DIY Foam Aquatic Animals
Turn your pool into a lively aquarium this summer with time and some foam! This is a great activity for little ones old enough to use safety scissors. It’s also a quick and easy craft for mom or dad to turn your pool into a world of wondrous water creatures.
What You’ll Need:
- Closed-Cell Foam
- Paper
- Pencil
- Marker
- Scissors
How to Make:
- Gather your supplies.
- Find free online printable templates for aquatic creatures like fish, whales, seahorses, turtles, etc., and print them out.
- Cut out your aquatic paper templates.
- Lay your paper templates on your poly craft/acoustic foam, and use your marker to outline the template.
- Cut the shapes out of the foam with scissors.
- Brush off any stray foam pieces and then place them in the pool and watch the hours of fun!
DIY Pool Scrabble
Turn some polyethylene foam sheets into scrabble tiles, and play scrabble in the pool! This project is perfect for kids of all ages. Mix a bit of learning with your summer fun.
What You’ll Need:
- Polyethylene foam sheets in the thickness and size of your choice
- Measuring tape or ruler
- Utility knife (adults only!) or scissors
- Permanent marker in a dark color
How to make:
- Measure out on your polyethylene foam sheet as many evenly sized squares as possible, (at least 6″ x 6″) and enough to double the alphabet (52 squares total). Any leftovers can be used to create more vowels or “blank” scrabble tiles.
- Once measured, begin cutting the squares.
- After all of the squares are cut, take your permanent marker and write one letter of the alphabet on each square. For even more options, feel free to write letters on both sides.
- Allow the marks to dry for several hours or overnight.
- Take your new scrabble tiles to the pool, toss them into the water, and let your kids (and kids at heart) swim after them to collect pieces to spell out a word. Throw them back into the water repeatedly to keep the fun going!
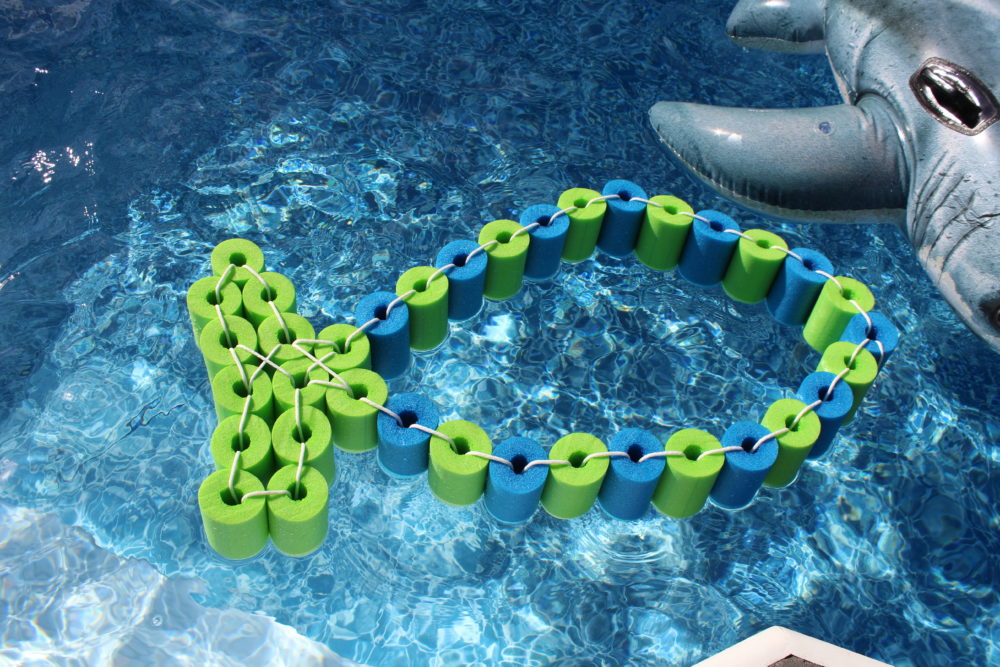
DIY Pool Noodle Fish Float
This float can be wonderful fun for both kids and adults, alike! It will allow anyone to rest their head on a ‘fish tail’, soaking up the sun if they wish while floating and cooling off in the water.
What You’ll Need:
- Polyethylene cylinders, or pool noodles, 2–4 inches thick and at least 12 feet long (or three 4-foot-long, and 2-1/3½’ per inches thick pool noodles)
- 50 feet of smooth, abrasion-resistant rope of polypropylene blend or nylon
- Scissors
- Serrated Knife
- Lighter (to burn the ends of the rope to prevent fraying)
How to Make:
- Cut your pool noodles or polyethylene cylinders into sections. Using a ruler or tape measure, make sure to cut the same size for each segment with your serrated knife (roughly 4-inch sections).
- If you’re using a pool noodle, you can begin stringing it along the rope. If the cylinder is not a pool noodle or does not have a hole, cut an X shape in the center of each section to push the rope through. Find the middle of the rope with your first section.
- Thread both ends of the rope through the holes in the second pool noodle segment (through the hole of each pool noodle from the side where it came out of the previous noodle; the rope will cross inside the pool noodle hole.) Once threaded, pull taut.
- Continue to add pool noodles or polyethylene cylinders until you’re near the end, leaving a foot or two of rope left over.
- Connect the two ends of the pool noodle strip by stringing both ends through the first pool noodle you strung, then take the rope from that pool noodle and string it through the very last section you added to the rope, pull both ends taut.
- Now, tie a double knot tight against the pool noodles to bring both ends together. Cut off any excess rope and burn the ends to prevent unraveling.
- Take your string of pool noodle sections and shape it into a figure eight, where one end of the figure eight will become the “fish tail” and thus be smaller than the other end, which is the fishes “body.” String left over rope through the tail’s noodle segments so that it forms an X of rope along the top to keep it in place, then tie a snug knot against everything and cut off any excess. Burn the ends to prevent unraveling.
- Push the center of the smaller end of the “fish tail” together until it forms the shape of a fin; use any leftover rope to tie it in place; cut any leftover rope and burn the ends one last time to keep it from unraveling.
- Voila! Enjoy your new fish pool float!
Create some poolside memories and easy joy with DIY foam pool toys for summer with help from us here at Foam Factory!
