As do-it-yourself (DIY) projects continue to gain popularity, homeowners and hobbyists alike are increasingly taking on tasks once left to professional tradespeople. From furniture restoration to custom builds, there’s been a noticeable shift toward personalization, cost-efficiency, and hands-on involvement in home improvement. With over 30 years in the comfort and support industry, we have observed this growing interest firsthand, especially in the area of DIY cushion construction and repair.
Whether it’s replacing sagging couch cushions, crafting custom window seat padding, or upgrading dining chair seats for better support, foam plays a central role in many upholstery projects. And while cutting and shaping foam is relatively simple with the right tools, many DIYers encounter a common challenge: their project requires foam dimensions that exceed the size of a single sheet. Fortunately, this obstacle has a tried-and-true solution—bonding multiple foam pieces together with adhesive.
At first glance, gluing foam may seem counterintuitive. However, this method has been widely used in the foam manufacturing and upholstery industries for decades. Even better, it’s a process that’s easy to replicate at home with minimal tools and just a bit of guidance. Below, we’ll walk you through our foam glue tips for DIY, ensuring strong, seamless results for your next custom cushion build.
Why Gluing Foam Works
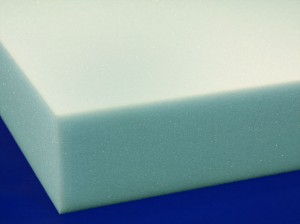
Foam—especially open-cell foams like polyurethane and closed-cell foams—is highly porous, allowing adhesives to permeate and create a durable bond when applied correctly. With the right adhesive and method, joined foam sections maintain flexibility and structural integrity, making the seam virtually undetectable in a finished cushion. This capability is especially important in applications where comfort and compression matter, such as in seating, bedding, or ergonomic supports.
Selecting the Right Foam Adhesive
The type of adhesive you use plays a critical role in the success of your project. Not all glues are formulated to bond with foam, and some may even damage the material. Certain solvent-based adhesives can cause foam to melt, shrink, or degrade over time. That’s why it’s essential to choose a foam-specific adhesive that’s designed to work in harmony with the chemical composition and cellular structure of the material.
We stock a range of commercial spray adhesive engineered for compatibility with open-cell and closed-cell foams. We also carry adhesive options safe for polystyrene, which is notoriously sensitive to solvents. These products are offered in convenient aerosol spray cans, ensuring even coverage and easy application over large surfaces.
Key benefits of foam adhesives include:
• Strong yet flexible bond – Prevents stiff seams in cushions
• Even spray distribution – Covers wide areas with minimal waste
• Fast drying time – Ideal for quick turnaround projects
• Long-term durability – Maintains integrity through compression and flexion cycles
While it may be tempting to use household glues or brush-on adhesives, these are not designed for foam applications and often result in uneven bonds, surface hardening, or structural failure.
Step-by-Step: How to Glue Foam Together
Once you’ve chosen the appropriate adhesive, follow these steps to create a professional-grade bond between foam sections:
- Surface Preparation:
Begin by making sure both foam pieces are clean and dry. Any dust, debris, or moisture can compromise the bond. Trim edges as needed to make sure the mating surfaces are flat and square. - Apply Adhesive:
Shake the spray can thoroughly. Apply a light, even coat to both surfaces that will be joined. Foam adhesives are contact adhesives, meaning both surfaces need to be coated to create a successful bond. - Wait for Tacky Phase:
Allow the adhesive to sit for approximately 15 to 30 seconds, depending on ambient temperature and humidity, until it becomes tacky to the touch. - Align and Compress:
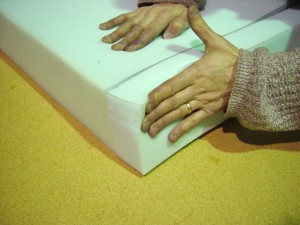
Carefully align the foam pieces, focusing on maintaining proper orientation and edge matching. Once aligned, press the pieces together firmly and evenly. For small to medium projects (e.g., throw pillows, seat cushions), use hand pressure or clamps with a wide surface area to compress the bond without deforming the foam. - Maximize Bond Strength:
Due to foam’s porous nature, applying pressure ensures the adhesive penetrates deep into the material. For large cushions or oversized pads, compressing the entire surface at once may not be feasible. In these cases, use your fingers to pinch along the seam line, working from one end to the other. Then, flip the cushion and repeat the process on the opposite side. - Cure Time:
Our adhesives are formulated to cure quickly. Most bonds are ready for use within 15 to 30 minutes, though full curing strength is achieved after a few hours.
Applications and Use Cases
Gluing foam is especially useful for projects that require non-standard dimensions or unique shapes. Examples include:
• Bay window seating – where large, continuous cushions are required
• Sectional sofa repairs – when replacing select cushions instead of all
• Outdoor furniture – by layering closed-cell foam for waterproof applications
• Custom mattress toppers – combining multiple densities for ergonomic support
With the right adhesive, DIYers can layer foam to achieve varied firmness or integrate contoured cuts for lumbar support—all at a fraction of the cost of custom manufacturing.
Additional Tips
• Always work in a well-ventilated area when using spray adhesives.
• Protect your workspace with drop cloths or cardboard to catch overspray.
• Wear gloves to avoid contact with adhesive, and consider a respirator for prolonged projects.
• Test on scrap foam if you’re unsure of the adhesive’s compatibility or drying behavior.
Master Foam Bonding for Cushions That Last
Creating your own foam cushions doesn’t have to be complicated or expensive. By using high-quality foam products and foam-compatible adhesives from Foam Factory, you can take full control over your upholstery projects—achieving custom comfort, cost savings, and the satisfaction of doing it yourself. Whether you’re repairing a favorite couch or building a window seat from scratch, mastering foam glue tips for DIY is a simple but essential step toward professional-grade results.
For adhesive recommendations and DIY support, visit our Foam Accessories for Commercial Products page or contact our team directly.

Related question: Is gluing acoustic foam to closed cell foam viable, will it adhere and support 2″ acoustic foam tiles? My intent is to adhere the closed foam backer to a smooth, poured concrete interior wall, then adhere/glue acoutic foam tiles to the backer foam. My objective is to create a visually pleasing wall in what will become my low-budget vocal recording space. Thanks for yoru reply.
Yes, our 3M Super 77 Spray Adhesiveshould work to glue acoustic foam to closed cell foam.