Cutting Foam for Cushion Covers: A Guide
Foam is an incredibly versatile material used for everything from cushions to custom projects — but if you’re working with polyurethane foam for the first time, cutting it can feel a bit tricky. Don’t worry; with the right approach and tools, you can achieve clean, precise cuts that make your project shine. Let’s break down exactly how to cut foam for your cushion covers the right way for the best results.
What You’ll Need Before You Start
Preparation is everything. Gather these essentials before diving in:
- Your sheet of polyurethane foam
- Adjusted cushion measurements from your “How to Measure” step
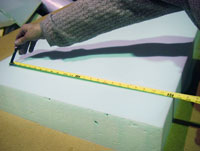
- Tape measure
- A long straight edge, like a yardstick or ruler
- A sharp carving knife or an electric knife with a blade longer than your foam thickness
Plotting Your Cushions: Lay the Groundwork
Before cutting, it’s important to plan your cuts carefully. Use your adjusted measurements to plot the largest length and width of each cushion on the foam sheet. A handy trick is to create templates by cutting newspaper to your cushion dimensions — place these on the foam to visualize the layout and spacing. This helps prevent running out of space and makes sure cushions fit correctly, whether placed side-by-side or end-over-end.
Once you’ve arranged your templates, make small marks on the foam edges to roughly outline each cushion’s boundary.
Marking the Foam: Precision is Key
With your cushion boundaries set, it’s time to mark your foam:
- Whenever possible, use the foam sheet’s edge as one side of your cushion. This cuts down on the number of cuts you need to make and gives you factory-perfect straight edges on two sides.
- Avoid sharing cutting lines between cushions. It might save time, but it increases risk — one slip could ruin multiple cushions. Leave a small buffer around each piece to make mistakes manageable.
Facing the foam’s edge as your cushion’s back, use a straight edge and marker to place tick marks spaced comfortably along the outline. Don’t draw full lines just yet — double-check your measurements first.
Connecting the Dots: Finalize Your Cut Lines
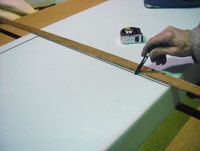
Confirm your tick marks form straight lines that match your cushion dimensions. When everything checks out, connect the marks carefully using your straight edge. Avoid digging the marker tip into the foam; you just need clear guide lines for cutting.
Cutting Your Foam: Patience Makes Perfect
Before you start cutting, make sure your work surface is flat, sturdy, and won’t be damaged by your knife.

- Using a carving knife? Employ a gentle back-and-forth sawing motion. Let the blade do the work — don’t press hard or try to cut too quickly.
- Working with softer foam? It compresses easily, so applying too much pressure will squash the foam and cause uneven edges.
- For medium to firm foam? They resist compression more, but still, don’t force the blade. Less pressure means cleaner, straighter cuts.
If you’re using an electric knife, remember: slow and steady wins the race. Cutting foam is like slicing freshly baked bread — a slow, gentle motion prevents tearing and keeps your edges sharp. Start cutting from the outer edge of the foam sheet and follow your marked lines carefully for a flawless finish.
Master Foam Cutting with Ease
With these tips, cutting polyurethane foam won’t feel daunting anymore. Take your time, use the right tools, and you’ll be creating perfectly sized cushions and custom foam projects in no time!
